
Crop Monitoring and Vegetation Surveillance using Aerial Photography
Codemonk showcases the basic steps needed to configure autonomous flight for surveillance and monitoring over a predefined area from a ground control station located 2KMs away from the vegetation to be surveilled using a rudimentary quadcopter with 4k 60FPS video recording capabilities.

One of the most popular use cases of drone technology today is the monitoring and surveillance of day-to-day labour intensive operations, particularly in the field of agriculture to inspect crop yield and monitor estates that span hectares of land. This labour-heavy operation also becomes cost-intensive, when the highest levels of efficiency has to be attained in producing useful insights for farmers and grows alike.
And for this very reason, Agritech business that we have interacted with have always doubled down on easily deployable, cost-effective alternatives that is focused on enhance yield without expending substantial resources, monetary or otherwise. Invariable, Surveillance & Monitoring as a a Services becomes a viable route for agriculture practitioners.
Today, engineers at Codemonk showcase the basic step needed to configure autonomous flight for surveillance and monitoring over a predefined area from a ground control station (GCS) located 2KMs away from the vegetation to be surveilled using a rudimentary quadcopter with 4k 60FPS video recording capabilities.
1. Hardware Setup
In this section, we break down the barebones architecture of the drone being used, along with the telemetry system used, flight controller configuration, ground station setup (for autonomous flight), and finally, and image processing capability that can be implemented with open source libraries in python.
Required Components
- Original FPV drone frame and motors - we begin with the assumption that a basic 5-inch quadcopter is built, compatible with ArduFlight configurator
- ArduPilot-compatible flight controller (recommended: Pixhawk 4/6)
- GPS module with compass
- Telemetry radio set (recommend: RFD900x for 2km+ range)
- Raspberry Pi 4 (4GB or 8GB RAM)
- Power distribution board with 5V output for Raspberry Pi
- Camera module (compatible with 4K@60fps)
Wiring Diagram
Flight Controller (FC) ─── GPS/Compass
        │
        ├─── Telemetry Radio
        │
        ├─── Raspberry Pi 4 (via UART port)
        │
        └─── Power Distribution Board
        |
        |___ VTX
Once the above hardware is procured, we can shift our attention to configuring the flight controller - the first step in making your drone fly the way you want. Traditionally, any custom built drone is set up using Betaflight configurator. Although this is decent piece of software for FPV pilots and quadcopter engineers, we need to consider a much more manual but open-ended tool to configure the flight controller.
This is where we need to make one basis assumption, which is the expected range of this drone. For easier demonstration, lets consider that the estate being surveilled is within 2KMs of the ground control station. Of course, when executing similar missions, the range can be improved by making minor adjustments to the telemetry system and the GCS in place.
A typical 5-inch drone build can include parts similar to the below mentioned architecture.
Wireframe for Drone Architecture - List of Components to build the 5-inch quadcopter
1. Drone Hardware Setup
- Frame: iFlight Nazgul V3
- The base structure that houses all the components.
- Motors: iFlight Xing E Pro 2306 1700KV 6S Motors
- Power source for propellers providing thrust and maneuverability.
- Stack: Pixhawk 4/6
- ESC (Electronic Speed Controller): Converts control signals into the precise motor movements.
- Flight Controller (FC): Houses the logic for flight stabilization, telemetry processing, and sensor data integration.
- Raspberry PI 4 - Companion computer running Ubuntu
- Camera: DJI o3
- Captures video footage during flight.
- VTX (Video Transmitter): DJi o3
- Sends real-time video to the ground station for FPV (First-Person View) control.
- Receiver: Zerodrag Nexus1 ELRS Receiver
- Receives commands from the remote control or ground station.
- Antenna: iFlight Albatross 100mm V2 5.8GHz Antenna
- Enhances signal reception and transmission capabilities.
- GPS: BLITZ M10 GPS V2
- Provides location data for autonomous flight or navigation systems.
- Propellers: Gemfan SBANG 4934 Tri-Blade 4.9″ Propellers
- Converts motor rotation into lift and maneuverability.
2. Telemetry System
- GPS + FC: Provides real-time data such as position, speed, altitude, and heading.
- Barometer (on FC): Measures altitude based on air pressure.
- IMU (Inertial Measurement Unit): Detects angular motion and acceleration, sending flight stabilization data to the flight controller.
- Telemetry Transmission: The FC transmits telemetry data via a telemetry radio module (not specified, but could be added).
- Ground Station Communication: Using software like Mission Planner, telemetry data is received and analyzed on a laptop/tablet.
- Protocol: Could utilize MAVLink (popular open-source communication protocol).
3. Flight Controller Configuration
- Firmware: The flight controller uses ArduPilot or Betaflight or INAV firmware to manage flight parameters.
- PID Tuning: Optimizes the drone’s control loops for stabilization.
- Autonomous Capabilities: INAV can be used for waypoint navigation and autonomous missions using GPS data.
- Sensors Integration: Gyroscope, Accelerometer, Magnetometer, and Barometer are tuned to provide real-time flight stability data.
- Radio/ELRS Configuration: Configures the ELRS receiver for low-latency control.
4. Ground Station Setup (For Autonomous Flight)
- Software: Using open-source GCS (Ground Control Software) like QGroundControl or Mission Planner.
- Mission Planning: Define waypoints, execute automated missions using GPS and other telemetry data.
- Ground Station Hardware:
- Laptop/Tablet: Connected to the drone via telemetry module or WiFi.
- Remote Control: Can be used for manual flight override.
- Video Receiver: Captures FPV feed and sends it to a display screen.
- Monitoring: Receives flight data in real-time, displaying altitude, speed, battery level, and location.
- Control: Allows manual intervention if necessary.
5. Image Processing with Python (Open Source Libraries)
- Captured Data: Raw video feed from the DJI o3 camera.
- Libraries Used:
- OpenCV: Used for real-time video/image processing.
- TensorFlow/Keras: Can be used for applying deep learning models for object detection or classification.
- Scikit-Image: Used for image segmentation, feature extraction, and transformations.
- DroneKit: Can integrate with MAVLink for automating drone missions based on image processing results.
- Workflow:
- The video feed from the camera is processed in real time using OpenCV.
- Features like object detection, tracking, or pattern recognition can trigger automated actions, like returning to home or avoiding obstacles.
- Data from the GPS and telemetry system can be combined with processed image data to make flight decisions in real-time.
2. Software Setup
The open-ended configurator considered here is the ArduPilot firmware, which can essentially instil autonomous flight to anything that can fly.
You can download this open-source tool from the below link. Bare is mind to download the correct firmware for your preferred type of surveillance drone.
https://firmware.ardupilot.org/
Flight Controller Configuration
Once the firmware is downloaded, you can flash it on to your flight controller with the below parameters.
- Connect flight controller via USB
- Flash ArduPilot firmware:
- Select appropriate board type
- Download latest stable version
- Click "Load Custom Firmware" and select the downloaded file
Essential Parameters Configuration
# Basic Frame Configuration
FRAME_CLASS = 1         # 1 for quad
FRAME_TYPE = 1          # X configuration
FS_THR_ENABLE = 1      # Throttle failsafe enabled

# GPS Configuration
GPS_TYPE = 1           # Standard GPS
GPS_NAVFILTER = 6      # Auto select filter
COMPASS_USE = 1        # Enable compass
COMPASS_AUTODEC = 1    # Auto declination

# RC Configuration
RC_SPEED = 50          # RC input speed in Hz
RC_CHANNELS = 8        # Number of RC channels

# Flight Modes
FLTMODE1 = 0          # Stabilize
FLTMODE2 = 2          # ALT_HOLD
FLTMODE3 = 3          # AUTO
FLTMODE4 = 5          # LOITER
FLTMODE5 = 6          # RTL
FLTMODE6 = 16         # POSHOLD

# Autonomous Flight Parameters
WP_RADIUS = 200        # Waypoint radius in cm
WP_SPEED = 500         # Waypoint speed in cm/s
WPNAV_SPEED = 500      # Navigation speed
RTL_ALT = 5000         # Return to launch altitude (50m)
Failsafe Configuration
# Battery Failsafe
BATT_FS_VOLTS = 14.0   # Battery voltage triggering failsafe
BATT_FS_MAH = 0        # Battery capacity triggering failsafe
BATT_FS_LOW_ACT = 2    # Action on low battery (RTL)

# GPS Failsafe
FS_GPS_ENABLE = 1      # Enable GPS failsafe
FS_GPS_TIMEOUT = 5     # GPS failsafe timeout

# Radio Failsafe
FS_THR_VALUE = 950     # Throttle failsafe value
FS_GCS_ENABLE = 1      # Ground station failsafe enable
Once the flight controller is configured for the above mentioned hardware, we proceed to set up the ground control station (GCS) for mission planning. The below link should guide you to install the most minimal versions of GCS, compatible with Windows.
https://ardupilot.org/copter/docs/common-install-gcs.html
2. Mission Planner Configuration
We can follow this 3-pronged approach to planning our mission for our surveillance activities.
- Initial Setup: (We covered this very step above)
- Install Mission Planner
- Flash ArduPilot firmware
- Configure basic parameters
- Ground Testing:
- Test flight controller connection
- Verify parameter settings
- Test camera system
- Flight Testing:
- Start with manual flight
- Test autonomous features one at a time
- Gradually increase mission complexity
Connection Setup
- Select COM port
- Set baud rate to 57600
- Click Connect
- Verify connection with "Connected" message
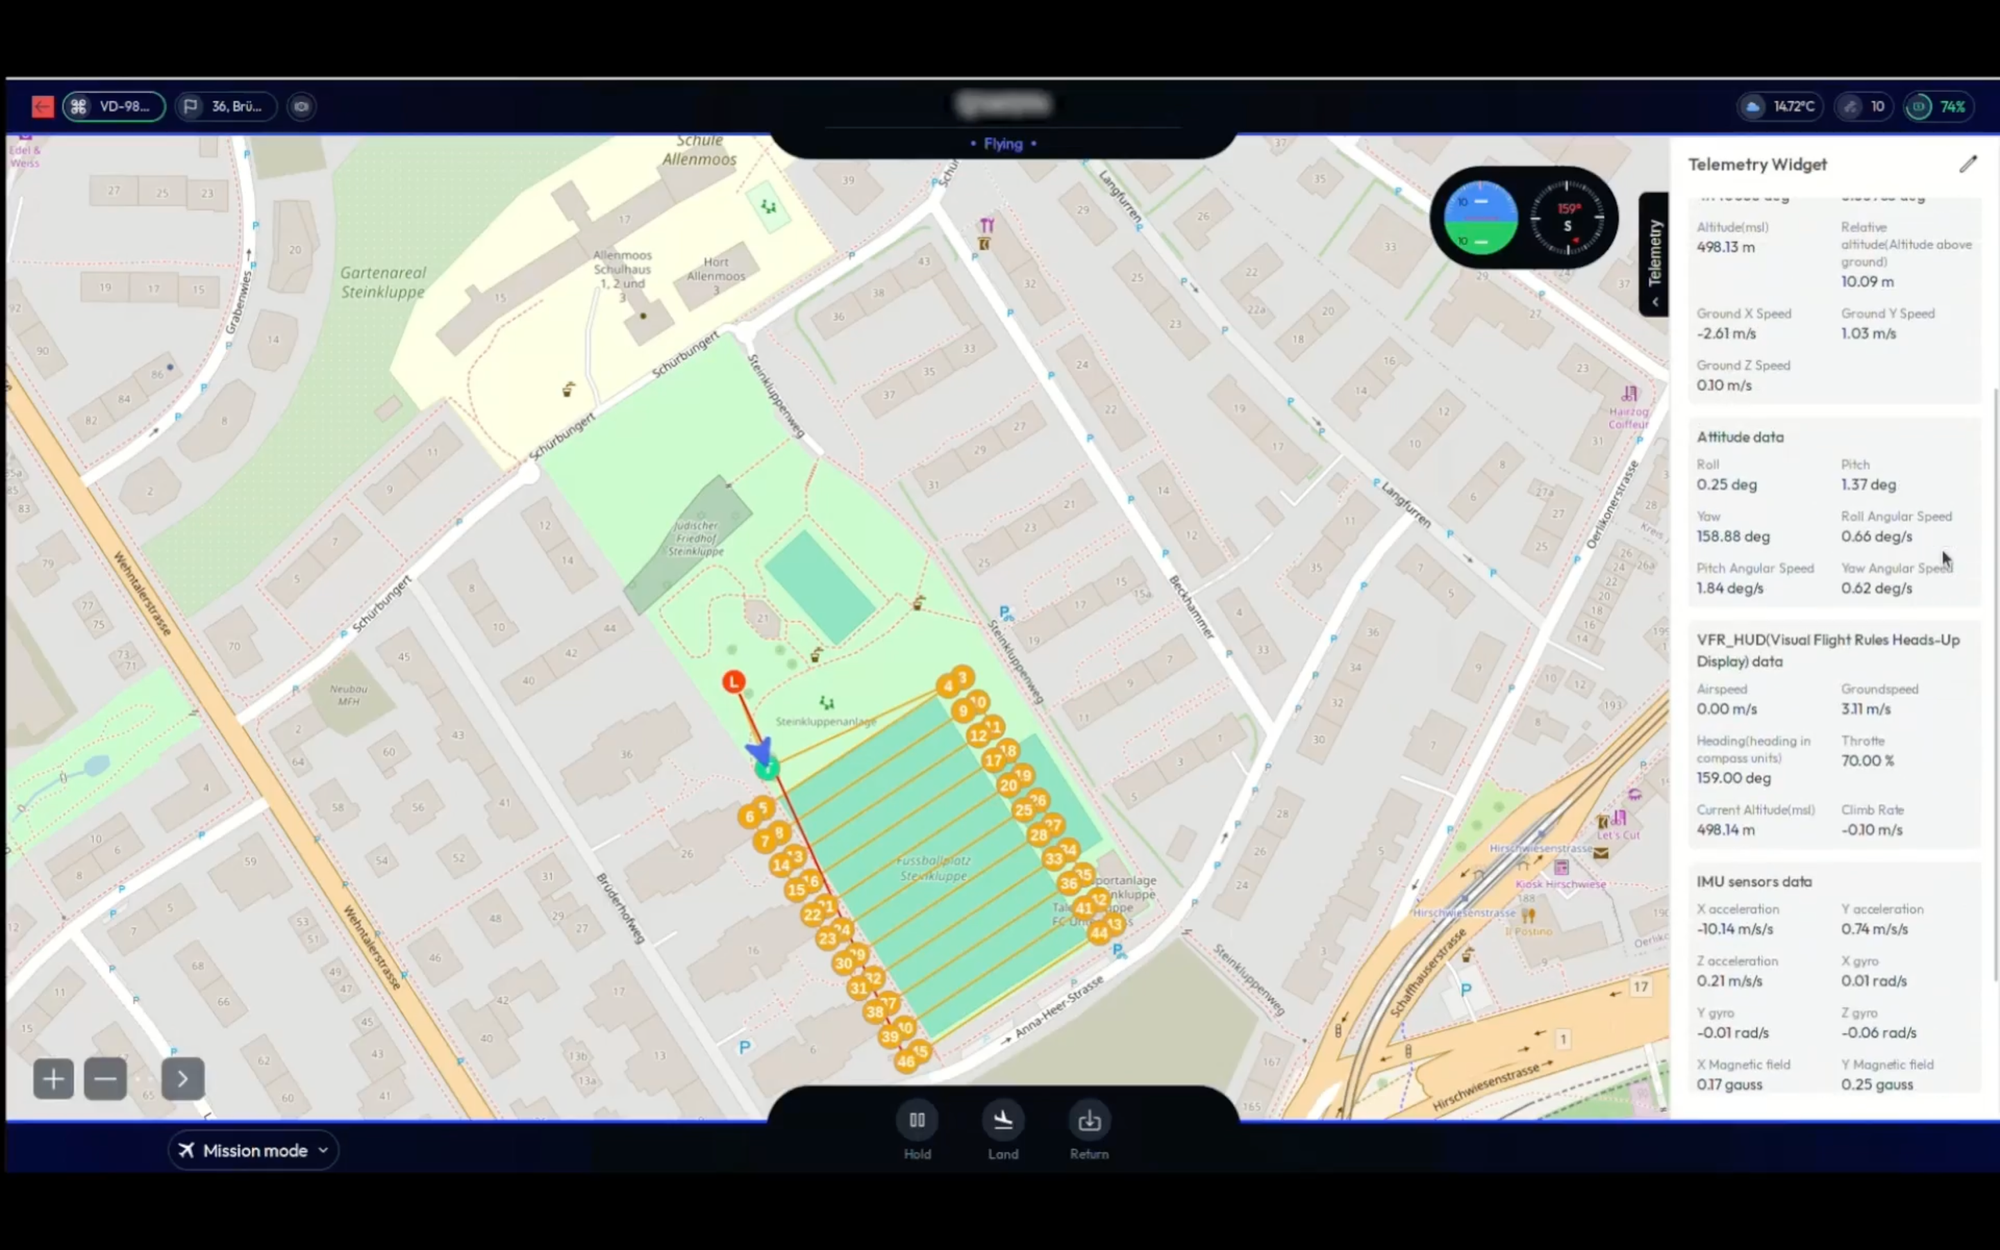
Flight Data Screen Configuration
The ground control station's OSD (On-Screen Display) is configured to record the below information during flight.
#Required Data Elements
- Artificial Horizon
- GPS Status
- Battery Status
- Flight Mode
- Radio RSSI
- Distance to Home
- Ground Speed
3. Mission Script Implementation
The autonomous mission script (Sample attached below) needs to be run from your ground control station (GCS) or companion computer. Here are the different approaches and their setup configurations:
To get started, I recommend the following approach:
- Choose your deployment method:
- For initial testing: Run from your laptop/desktop GCS
- For production: Set up a Raspberry Pi as companion computer
- For GCS deployment:
- Set up the Python environment
- Connect to your drone via telemetry radio
- Run the script with appropriate connection string. We have found out that ELRS telemetry system proves to be the most versatile and easy to use configurator for the mission at hand.
- For Companion Computer deployment:
- Install Raspberry Pi OS
- Set up the automatic mission service
- Configure automatic startup
Raspberry Pi Setup
- Install Ubuntu Server 20.04 LTS
- Install required packages:
bash
sudo apt update
sudo apt install python3-pip mavproxy python3-opencv
pip3 install dronekit opencv-python numpy
Once the Raspberry PI is configured, we can design a basic autonomous mission script using python and run it using the GCS.
Basic Autonomous Mission Script
Note: Ensure that the drone, telemetry system, and the GCS are connected and communicate with each other without any loss in signal. Then, you can run the below mission script, while making any modification necessary as per the drone and telemetry system in place.
# in python
from dronekit import connect, VehicleMode, LocationGlobalRelative
import time
from pymavlink import mavutil

class AutonomousDrone:
    def __init__(self, connection_string='/dev/ttyACM0'):
# Connect to vehicle
        self.vehicle = connect(connection_string, wait_ready=True, baud=57600)

    def pre_flight_checks(self):
        """Perform pre-flight checks"""
        checks = {
            'Battery': self.vehicle.battery.level > 50,
            'GPS': self.vehicle.gps_0.fix_type > 2,
            'EKF': self.vehicle.ekf_ok,
            'Armed': not self.vehicle.armed
        }
        return all(checks.values()), checks

    def arm_and_takeoff(self, target_altitude):
        """Arm vehicle and takeoff to target altitude"""
        while not self.vehicle.is_armable:
            print("Waiting for vehicle to initialize...")
            time.sleep(1)

        self.vehicle.mode = VehicleMode("GUIDED")
        self.vehicle.armed = True

        while not self.vehicle.armed:
            print("Waiting for arming...")
            time.sleep(1)

        print("Taking off!")
        self.vehicle.simple_takeoff(target_altitude)

        while True:
            altitude = self.vehicle.location.global_relative_frame.alt
            print(f"Altitude: {altitude}")
            if altitude >= target_altitude * 0.95:
                print("Reached target altitude")
                break
            time.sleep(1)

    def execute_grid_mission(self, area_width, area_length, altitude, spacing):
        """Execute a grid pattern over rectangular area"""
# Calculate grid points
        waypoints = self._calculate_grid_pattern(
            self.vehicle.location.global_frame,
            area_width, area_length, spacing
        )

        for waypoint in waypoints:
            print(f"Flying to waypoint: {waypoint}")
            self.vehicle.simple_goto(waypoint)

# Wait until reached waypoint
            while True:
                remaining_distance = self._get_distance_metres(
                    self.vehicle.location.global_relative_frame,
                    waypoint
                )
                if remaining_distance < 1:
                    break
                time.sleep(2)

    def return_to_launch(self):
        """Return to launch location"""
        self.vehicle.mode = VehicleMode("RTL")
        while self.vehicle.mode.name == "RTL":
            print("Returning to launch...")
            time.sleep(1)

    def _calculate_grid_pattern(self, home, width, length, spacing):
        """Calculate grid pattern waypoints"""
        waypoints = []
        rows = int(width / spacing)
        cols = int(length / spacing)

        for row in range(rows):
            for col in range(cols):
                lat = home.lat + (row * spacing / 111111.0)
                lon = home.lon + (col * spacing / (111111.0 * cos(home.lat)))
                waypoints.append(LocationGlobalRelative(lat, lon, home.alt))

        return waypoints
With the above calibration completed, we can test the mission by executing the sample script provided here:
Mission Execution Script
Using the GCS, we can run the below mission execution script to verify if our mission plan works as intended, thereby making refinements on the go for any failures.
Since, each terrain is different, with more diverse vegetation, prescribing a mission script that can be simply copied and implemented across many regions is impractical. Which is why, we make the below assumptions as a part of our mission plan.
def main():
    drone = AutonomousDrone()
    # Perform pre-flight checks
    checks_passed, check_results = drone.pre_flight_checks()
    if not checks_passed:
        print("Pre-flight checks failed:", check_results)
        return

    try:
        # Take off to 100 meters
        drone.arm_and_takeoff(100)

        # Execute grid mission
        drone.execute_grid_mission(
            area_width=500,  # meters
            area_length=500,  # meters
            altitude=100,    # meters
            spacing=50       # meters between passes
        )

        # Return to launch
        drone.return_to_launch()

    except Exception as e:
        print(f"Mission aborted: {e}")
        drone.return_to_launch()

    finally:
        drone.vehicle.close()

if __name__ == '__main__':
    main()
Failsafe Configuration
In addition to the mission planning, we also need to design failsafe protocols, using which the drone can return home when faced with two likely scenarios:
- Loss of communication with GCS/Telemetry
- battery running low or draining rapidly
- Set RTL (Return to Launch) altitude:
RTL_ALT = 100
Configure GCS failsafe:
FS_GCS_ENABLE = 1
FS_GCS_TIMEOUT = 5 (seconds)
Configure battery failsafe:
BATT_FS_LOW_ACT = 2 (Return to Launch)
BATT_FS_CRT_ACT = 1 (Land immediately)
Legal Considerations
- Check local aviation authorities for drone operation regulations
- Obtain necessary permits for autonomous flight operations
- Maintain visual line of sight or obtain BVLOS approval
- Register your drone if required by local laws
4. Image Processing Script
Once the drone surveils the designated area, it would record the footage capturing the vegetation within this region. This recorded video can then be processed, frame-by-frame, breaking down the video into a series of images that can be analysed using the below python script.
The below script is written for real time transmission of video feed directly to the GCS located 2KMs away. But, for simpler operation, we could conduct image processing after retrieving the drone from its surveillance mission and analyse the video feed locally.
import cv2
import numpy as np
from datetime import datetime
import logging
from typing import Tuple, Optional
import json

# Configuration
CONFIG = {
    "camera": {
        "width": 3840,
        "height": 2160,
        "device_id": 0
    },
    "vegetation": {
        "hsv_lower": [35, 50, 50],
        "hsv_upper": [85, 255, 255],
        "threshold_percentage": 60
    },
    "output": {
        "save_anomalies": True,
        "output_dir": "anomalies/"
    }
}

class VegetationAnalyzer:
    def __init__(self, config: dict):
        self.config = config
        self.setup_logging()

    def setup_logging(self):
        logging.basicConfig(
            level=logging.INFO,
            format='%(asctime)s - %(levelname)s - %(message)s',
            filename='vegetation_analysis.log'
        )

    def analyze_vegetation(self, frame: np.ndarray) -> Tuple[float, np.ndarray]:
        """
        Analyze vegetation coverage in a frame.

        Args:
            frame: Input BGR frame

        Returns:
            Tuple of (vegetation percentage, vegetation mask)
        """
        try:
            # Convert to HSV color space
            hsv = cv2.cvtColor(frame, cv2.COLOR_BGR2HSV)

            # Create vegetation mask
            lower_green = np.array(self.config["vegetation"]["hsv_lower"])
            upper_green = np.array(self.config["vegetation"]["hsv_upper"])
            mask = cv2.inRange(hsv, lower_green, upper_green)

            # Calculate coverage
            vegetation_pixels = cv2.countNonZero(mask)
            total_pixels = frame.shape[0] * frame.shape[1]
            vegetation_percentage = (vegetation_pixels / total_pixels) * 100

            return vegetation_percentage, mask

        except Exception as e:
            logging.error(f"Error in vegetation analysis: {str(e)}")
            return 0.0, None

    def process_frame(self, frame: np.ndarray) -> Tuple[np.ndarray, float]:
        """
        Process a single frame.

        Args:
            frame: Input BGR frame

        Returns:
            Tuple of (processed frame, vegetation percentage)
        """
        # Optionally resize for analysis
        analysis_frame = cv2.resize(frame, (960, 540))

        # Analyze vegetation
        veg_percentage, mask = self.analyze_vegetation(analysis_frame)

        # Handle anomalies
        if (veg_percentage < self.config["vegetation"]["threshold_percentage"]
            and self.config["output"]["save_anomalies"]):
            self.save_anomaly(frame, veg_percentage)

        # Add overlay
        self.add_overlay(frame, veg_percentage)

        return frame, veg_percentage

    def save_anomaly(self, frame: np.ndarray, percentage: float):
        """Save frames with potential vegetation issues."""
        timestamp = datetime.now().strftime("%Y%m%d_%H%M%S")
        filename = f'{self.config["output"]["output_dir"]}anomaly_{timestamp}_{percentage:.1f}.jpg'
        cv2.imwrite(filename, frame)
        logging.info(f"Saved anomaly frame: {filename}")

    def add_overlay(self, frame: np.ndarray, percentage: float):
        """Add information overlay to frame."""
        cv2.putText(
            frame,
            f"Vegetation: {percentage:.1f}%",
            (10, 30),
            cv2.FONT_HERSHEY_SIMPLEX,
            1,
            (0, 255, 0),
            2
        )

    def process_video_feed(self):
        """Process continuous video feed."""
        try:
            cap = cv2.VideoCapture(self.config["camera"]["device_id"])

            if not cap.isOpened():
                raise RuntimeError("Failed to open camera")

            # Set camera properties
            cap.set(cv2.CAP_PROP_FRAME_WIDTH, self.config["camera"]["width"])
            cap.set(cv2.CAP_PROP_FRAME_HEIGHT, self.config["camera"]["height"])

            logging.info("Started video processing")

            while True:
                ret, frame = cap.read()
                if not ret:
                    logging.error("Failed to read frame")
                    break

                processed_frame, percentage = self.process_frame(frame)

                # Here you would implement your streaming solution
                # Example: stream_frame(processed_frame)

        except Exception as e:
            logging.error(f"Error in video processing: {str(e)}")

        finally:
            cap.release()
            logging.info("Released camera resources")

def main():
    # Load configuration
    analyzer = VegetationAnalyzer(CONFIG)
    analyzer.process_video_feed()

if __name__ == "__main__":
    main()
While the above script holds true for video streamed from the camera on the drone, the live video feed can be analyse in real time and after the completion of the above mission. Since analysing recorded video is beyond the scope of this guide, we will not dive deeper into that specific function, but we are indeed happy to detail that out as well upon request.
And, upon completing the test flight and the first calibration mission, we need to ensure that standard operating procedures are established before we begin carrying out these surveillance and monitoring missions regularly. Although this is common knowledge, responsible implementation of drone technology is the first step in achieving perfection and controlled operation.
We recommend every drone engineer to adhere to the below guidelines are mandatory practices before initiating any such mission.
5. Maintenance and Operation
Pre-flight Checklist
- Battery voltage check
- GPS signal verification (minimum 14 satellites)
- Compass calibration
- Radio link range test
- Mission upload verification
- Weather conditions assessment
- Failsafe testing
Regular Maintenance
- Weekly:
- Propeller inspection
- Battery health check
- Firmware updates
- Monthly:
- Full system calibration
- Hardware inspection
- Log file analysis
6. Troubleshooting
Common Issues and Solutions: Utilising the MAV Link Protocol, the GCS can enable seamless connection with the drone surveilling the designated area, while relaying important messages during flight back to the GCS. Using this protocol, we can also instruct the drone to shut off video transmission protocol, when battery is running low, to ensure efficient management of flight time during mission execution. Below are some of the common messages relayed back to the GCS in order to take any corrective action necessary, such as return to launch triggers or more.
- GPS signal loss
- Check antenna orientation
- Verify GPS module connections
- Increase wait time for satellite lock
- Mission upload failures
- Verify MAVLink connection
- Check baud rate settings
- Video transmission issues
We can provide a detailed guide to configure MAV Link Protocol upon request, as that topic requires a detailed guide of its own; but the basis setup process follows the below steps:
MAV Link Protocol
- MAVLink Protocol
To start implementing MAVLink in your project, I recommend following these steps:
- First, install the required libraries: "pip install pymavlink"
- Start with basic connection and message monitoring:
- Implement the basic connection setup
- Monitor heartbeat messages
- Test basic commands like arming/disarming
Once, these calibration protocols are set,
- Implement waypoint navigation
- Add custom message handling
- Implement proper error handling
By following the guide upto this point, you should be able to use the built quadcopter to fly to the designated waypoint, capture aerial photographs in 4k, 60PFS, and finally, use the python script for image processing to obtain information on the vegetation under the camera lens.
In summary, this surveillance workflow can be broken down into these small fragments, thereby helping the GCS improve over time and across multiple missions.
- Start by learning ArduPilot basics and parameter configuration
- Practice mission planning with Mission Planner/QGroundControl
- Set up and test the telemetry system for long-range communication
- Implement basic autonomous flights before adding complex features
- Test thoroughly in a safe area before deploying over your estate
With Aerial Surveillance Vehicle configured , GCS established and the mission plan created, you will essentially be equipped with a drone that can fly to the specified waypoint autonomously, record video in 4k and relay the same back to the GCS. The obtained footage, real time or otherwise, can be processed to study the vegetation using the sample image processing script provided above.
We encourage every drone engineer attempting this project to reach out to us with their specific requirements, now that the barebones capabilities is laid out in the public domain. From the building of the aerial surveillance vehicle to the GCS setup and the vegetation processing function, Codemonk can fulfil any and all requirements in drone technology for autonomous flight. Drop us your enquiries and we shall respond with the most appropriate, fail-proof resolution for you mission statement.